Road markings ensure safety, guide traffic flow, and regulate vehicle movement effectively. Among the various technologies used for applying these markings, thermoplastic road marking machines stand out for their durability, reflectivity, and rapid drying characteristics.
We provides an in-depth, step-by-step explanation of how these machines operate—from material preparation to application—offering insights for engineers, contractors, and infrastructure planners.
Understanding Thermoplastic Road Marking
Thermoplastic markings are composed of synthetic resin, pigments, glass beads, and fillers. When heated to around 180°C–200°C (356°F–392°F), the material melts into a liquid form suitable for application. Upon cooling, it forms a durable, reflective, and wear-resistant line.
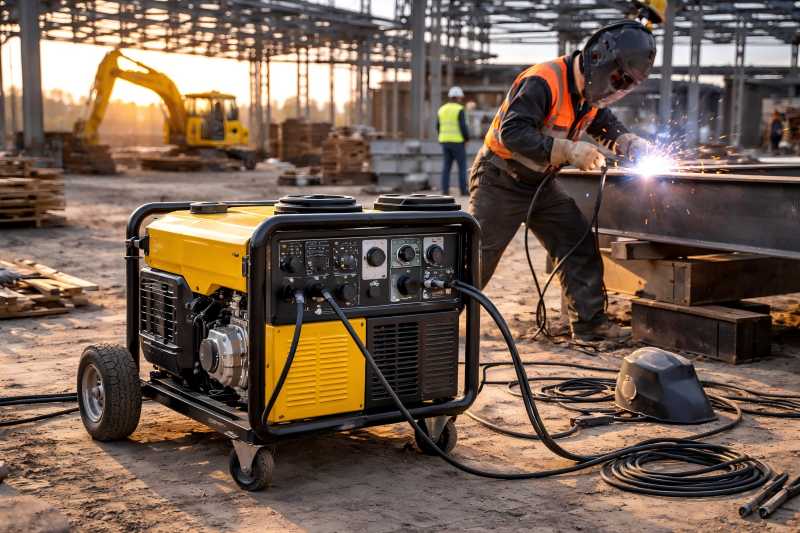
These markings are used in high-traffic areas, such as highways, intersections, pedestrian crossings, and airport runways, where longevity and visibility are essential. The thermoplastic road marking machine is the central piece of equipment in this process, designed to heat, apply, and ensure precise placement of the molten material on road surfaces.
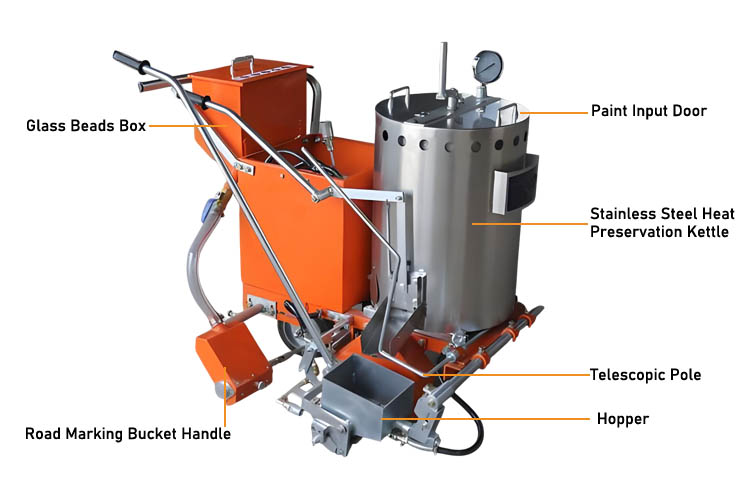
Components of Thermoplastic Road Marking Machine
Before starting the process, it’s essential to understand the machine’s main components. Each component contributes to accurate application, material consistency, and efficient operation.
- Melting Tank (Preheater): Heats thermoplastic materials to a liquid state before application. Typically double-layered for effective heat insulation.
- Diesel or LPG Burner: Provides the necessary heat to melt the thermoplastic compound evenly.
- Screed / Extrusion / Spray Applicator: Controls how molten thermoplastic is applied—through extrusion, screeding, or spraying.
- Glass Bead Dispenser: Applies reflective glass beads immediately after marking for enhanced night visibility.
- Thermostatic Control System: Maintains a consistent temperature to prevent material burning or underheating.
- Agitator / Stirring Device: Keeps the molten thermoplastic uniformly mixed to avoid clumping.
- Marking Shoe or Die Head: Shapes the line width and edges according to marking specifications.
- Wheels and Guidance System: Ensures straight, precise, and stable movement along the designated marking path.
Step 1: Material Preparation
The thermoplastic material is usually supplied in solid block or granular form. Before loading it into the marking machine, operators must ensure the material meets specifications—free from moisture and debris.
Procedure:
- Check the formulation — Verify resin, pigment, and glass bead ratios per project specifications.
- Load into the preheater tank — The preheater (or melting kettle) uses an LPG or diesel burner to heat the material to 180°C–200°C.
- Stir continuously — The agitator ensures uniform melting and prevents scorching.
- Monitor temperature — Overheating can degrade color and reduce bonding strength.
Note: The preheating stage usually takes 40–60 minutes depending on batch size and ambient temperature.
Step 2: Surface Preparation
A clean and dry surface is critical for strong adhesion. Before applying thermoplastic markings, the road surface is inspected and prepared.
Steps:
- Clean the surface using air blowers, brushes, or vacuum systems to remove dust, oil, and loose particles.
- Dry the area completely, especially after rain, since moisture causes poor bonding.
- Apply a primer if required—particularly on concrete roads—to enhance adhesion.
- Primer is usually a fast-drying liquid applied by brush or spray 10–15 minutes before marking.
Step 3: Machine Setup and Calibration
Once the road and material are ready, the marking machine must be configured for the project’s specifications.
- Set line width and thickness: Adjust the marking shoe or die head to the desired line width (commonly 100mm–150mm).
- Check temperature controls: Ensure the material in the kettle and the application head are both within the target temperature range.
- Calibrate glass bead dispenser: Set bead flow rate according to project requirements—usually 200–400 g/m².
- Mark guide lines: Surveyors or operators mark chalk lines or laser guides for alignment.
Calibration ensures uniform thickness, sharp edges, and proper reflectivity.
Step 4: Material Transfer to the Marking Machine
After melting and homogenization in the preheater, the molten thermoplastic is transferred to the road marking machine’s smaller application hopper. This step requires caution to maintain consistent temperature and avoid air entrapment.
Typical Transfer Process:
- The preheated material is poured through a filter screen to remove lumps.
- Fill the hopper to the desired material level.
- The internal agitator in the hopper continues to stir the material during application.
Temperature Control: The material should remain within 180°C–200°C in the hopper to ensure smooth flow through the marking shoe.
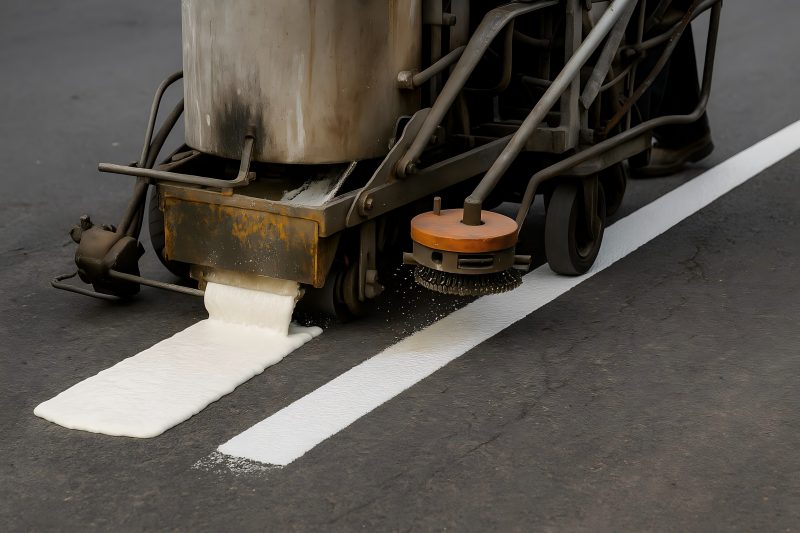
Step 5: Application on the Road
This is the core operational step where molten thermoplastic is laid down as markings. There are three main application methods depending on the machine type:
| Application Method | Description | Advantages | Common Uses |
| Screed Type | Material flows under gravity through a metal shoe, forming a raised line. | Simple, low maintenance. | Lane lines, edge lines. |
| Extrusion Type | Material is forced out by a screw or piston through a die. | Consistent thickness, sharp edges. | Crosswalks, arrows, symbols. |
| Spray Type | Material is atomized and sprayed onto the surface. | Suitable for complex markings or uneven surfaces. | Curved or temporary markings. |
Operational Sequence:
- Position the machine on the start point of the guide line.
- Begin releasing molten material through the marking shoe or die.
- Move the machine steadily forward at about 1–1.5 km/h.
- The marking is laid precisely according to pre-defined width and thickness (commonly 1.5–3 mm).
The marking machine operator must maintain consistent speed and line alignment for even coating and uniform thickness.
Step 6: Glass Bead Application
Immediately after the molten thermoplastic is applied, glass beads are sprayed onto the surface using a bead dispenser integrated into the marking machine.
Purpose of Glass Beads:
- Retroreflectivity: Beads reflect headlights at night for enhanced visibility.
- Durability: Embedded beads protect the marking from wear and tear.
- Safety: Ensures visibility in wet and dark conditions.
Key Parameters:
- Bead Size: Typically ranges from 100–600 microns.
- Dispensing Rate: 200–400 g/m² depending on specification.
- Timing: Beads must be dropped within 1 second after application while the thermoplastic is still molten.
If beads are added too early, they sink; too late, they fail to embed. Proper synchronization between marking and bead application ensures optimal performance.
Step 7: Cooling and Hardening
After application, the thermoplastic line begins to cool and solidify within 2–5 minutes. The cooling rate depends on environmental temperature, humidity, and layer thickness.
Cooling Methods:
- Natural cooling: Suitable for small-scale or low-traffic roads.
- Forced air cooling: Some machines use built-in fans to accelerate drying on high-traffic roads.
Once cooled, the thermoplastic hardens into a tough, reflective coating that adheres firmly to the road surface. Vehicles can usually drive over it after 5–10 minutes.
Step 8: Quality Inspection
Quality control ensures that markings meet the required dimensions, reflectivity, and adhesion standards.
Common Checks Include:
- Line width and thickness: Measured using gauges or templates.
- Retroreflectivity: Tested using retroreflectometers to measure luminance (mcd/m²/lux).
- Bond strength: Ensured by adhesion testing between the marking and pavement.
- Color and gloss: Confirmed visually or by spectrophotometer.
Defective or uneven areas are reheated and corrected manually with a small hand applicator.
Maintenance and Cleaning
To maintain efficiency and longevity of the marking machine:
- Clean the hopper and shoes daily after use to prevent residue buildup.
- Lubricate moving parts regularly.
- Inspect burners, thermostats, and hoses to ensure consistent heating.
- Replace damaged shoes or dies promptly to avoid uneven lines.
Regular maintenance extends machine life and guarantees durable, high-quality road markings.
Safety Considerations
Thermoplastic road marking involves high heat, demanding operators follow strict safety protocols.
Key Safety Measures:
- Wear heat-resistant gloves, boots, and goggles.
- Avoid overfilling the preheater to prevent overflow.
- Maintain distance from burners and open flames.
- Ensure good ventilation to prevent fume inhalation.
- Keep fire extinguishers near the worksite.
Training operators on safety and machine handling reduces accidents and ensures consistent performance.
Modern Technological Advances
Modern thermoplastic road marking machines now include advanced features to improve precision, speed, and safety:
- GPS-guided alignment systems for perfect line positioning.
- Automatic temperature control with digital sensors.
- Hydraulic drive systems for smoother and faster operation.
- Laser guide pointers for exact line tracing.
- Eco-friendly burners to minimize emissions.
These innovations boost efficiency and minimize operator errors.
Common Problems and Troubleshooting
Even with advanced technology, operators may encounter issues during operation. Below are common problems and practical solutions.
| Issue | Possible Cause | Solution |
| Uneven line thickness | Inconsistent temperature or speed | Maintain constant temperature and steady pace. |
| Poor adhesion | Wet or dusty surface | Ensure complete cleaning and drying before marking. |
| Glass beads not sticking | Beads applied too late or too early | Synchronize bead dispenser timing. |
| Burnt thermoplastic | Overheating in kettle | Check thermostats and reduce burner intensity. |
| Rough or uneven edges | Damaged marking shoe | Replace or repair shoe immediately. |
Training and maintenance minimize downtime and ensure smooth operation.
Environmental and Performance Benefits
Thermoplastic markings provide durable, sustainable, and cost-efficient performance.
Key Benefits:
- Long Lifespan: Typically lasts 3–5 times longer than solvent-based paint.
- Fast Drying: Roads reopen fast, reducing overall traffic delays efficiently.
- Reflectivity: Maintains night-time visibility for years.
- Eco-Friendly: Uses non-volatile binders with minimal VOC emissions.
These properties make thermoplastic markings the global standard for permanent road delineation.
Thermoplastic road marking machines are sophisticated systems that combine heat, pressure, and precision to deliver long-lasting, reflective road markings. Understanding their step-by-step operation—from material melting to bead application and cooling—helps operators achieve better efficiency, safety, and quality control.
As transportation networks expand and urban traffic density increases, thermoplastic marking machines will continue to play a vital role in ensuring safer, more visible, and more sustainable roads worldwide.