Achieving a flawless concrete surface requires more than just the right equipment—it demands skill, timing, and a deep understanding of the concrete finishing process. Among the essential tools in any concrete contractor’s arsenal is the power trowel, which transforms rough, freshly poured slabs into smooth, durable, and visually appealing surfaces.
Understanding the Power Trowel’s Role in Concrete Finishing
A power trowel, or power float, is used to finish concrete in its final placement stage. As concrete sets, it transitions from a wet, plastic state to a hardened surface. A power trowel enhances surface strength, flatness, and durability by compacting and smoothing the concrete during this transformation.
Unlike hand trowels, power trowels increase efficiency and consistency, especially across large surface areas. The goal is to create a dense, polished finish ready for coatings, tiles, or industrial use.
Key Components of a Power Trowel
Before learning how to operate a power trowel, first get to know its main components.
| Component | Function |
| Engine | Powers the blade system (gasoline, diesel, or electric) |
| Blades or Pans | Spin against the concrete to smooth and compact it |
| Handle (for walk-behind models) | Enables the operator to steer and control the machine precisely. |
| Control System | Adjusts blade pitch, speed, and operation mode |
| Guard Ring | Encloses the blades to enhance safety |
Power trowels come in two main types:
- Walk-behind trowels: Ideal for small to medium jobs.
- Ride-on trowels: Suitable for large-scale commercial or industrial projects.
Power Trowel Operation: Step-by-Step Guide
Step 1: Timing Is Everything
Perhaps the most important step in using a power trowel is knowing when to begin.
Concrete must be allowed to set partially before using a power trowel. Start too early, and you risk gouging the surface; start too late, and the machine won’t be able to work the slab.
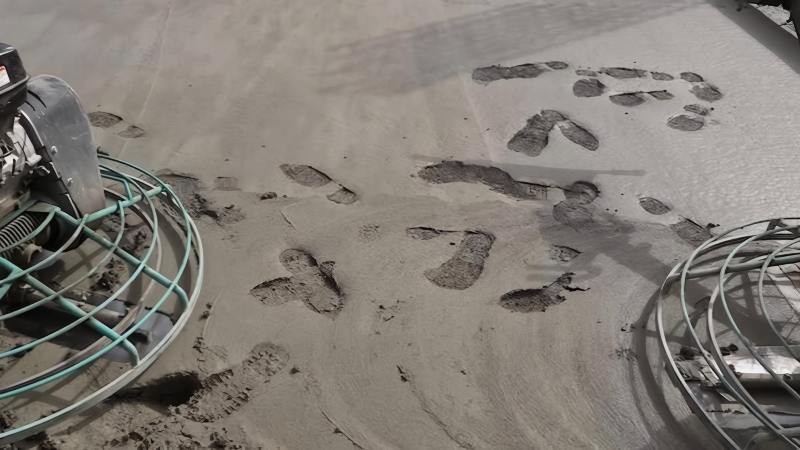
Pro tip: Use the footprint test—when walking on the slab, your boot should leave a slight imprint (1/8 to 1/4 inch). That’s the signal to begin troweling.
Step 2: Start with the Floating Stage
Begin with float blades or attach a trowel pan. This phase aims to:
- Level the surface
- Push down aggregate
- Bring up paste for finishing
Set the blade pitch flat and run at a slower speed. Overlapping passes and multiple directions will yield a more even surface.
Step 3: Switch to Finish Blades
Once the surface becomes firmer and can support greater pressure, it’s time to change to finish blades.
- Increase the blade pitch gradually (from 5° up to 30°).
- Increase the RPM for higher surface compaction.
- Make at least two finish passes, alternating directions.
Step 4: Final Pass
The goal is a hard, shiny, uniform surface. If there are visible swirls or blade marks, another pass may be necessary. Maintain consistent pressure and RPM across the entire slab.

Tips for a Perfect Finish
Keep an Eye on the Weather
Temperature, wind, and humidity all impact concrete setting time. On hot, dry days, concrete can set much faster, reducing your available window for troweling.
- Use sunshades or water misting if working under intense sunlight.
- In cold conditions, use insulating blankets to slow down curing.
Maintain the Right Blade Pitch
Blade pitch controls how aggressively the blades press on the surface.
| Pitch Angle | Effect |
| 0° – 5° | Float stage (gentle leveling) |
| 10° – 20° | Light to moderate finishing |
| 25° – 30° | Final finish (hard surface) |
Increasing blade angle adds downward pressure, ideal for densifying the surface during final passes. However, too much pitch too early can leave burn marks or gouges.
Use the Right Blade or Pan
- Float pans or clip-on blades: Best for the initial stage to prevent marking the slab.
- Combination blades: Handy for switching between float and finish without changing hardware.
- Finish blades: Designed for the final stage and polished finish.
Watch for Signs of Overworking
Too many passes or working a slab that is too dry can cause:
- Delamination (surface layer separates)
- Dusting (fine powdery surface)
- Cracking
If you hear a grinding noise or see blade marks that won’t smooth out, stop troweling.
Clean Blades Regularly
Concrete residue on blades reduces efficiency and can mar the surface.
- Scrape off build-up after each pass.
- At the end of the job, thoroughly clean with water and a wire brush.
Common Mistakes to Avoid
Even experienced contractors can make errors. Here are the most common mistakes and how to avoid them:
Starting Too Early
Operating on overly wet concrete leads to:
- Deep blade impressions
- Uneven surface texture
- Poor surface strength
Fix: Always test slab readiness with a footprint or hand press.
Ignoring Blade Condition
Worn, bent, or rusted blades result in:
- Inconsistent polishing
- Surface streaks
- Reduced efficiency
Fix: Inspect blades daily. Replace when edges wear down or warp.
Uneven Overlaps
Failing to maintain overlapping passes leaves:
- High/low spots
- Surface lines
Fix: Maintain 50% overlap with each pass and change direction between layers.
Using One Pass Only
- Single-pass finishing rarely yields a professional result.
Fix: Perform multiple passes with adjusted pitch and RPM.
Forgetting Edge Work
Power trowels can’t reach slab edges. Leaving edges untreated can:
- Cause differential shrinkage
- Result in cracking
Fix: Use a hand trowel or edge trowel to finish perimeter areas before machine troweling.
Safety Tips for Power Trowel Operation
Wear Appropriate PPE
Always use:
- Steel-toed boots
- Safety goggles
- Gloves
Hearing protection (for gas-powered models)
Use the Deadman Switch
- Walk-behind power trowels have a deadman switch or handle clutch that stops the blades when released. Never bypass or disable this feature.
Watch Blade Rotation
- Blades spin fast and can cause injury. Stay clear of the guard ring and never reach under the machine while it’s running.
Operate on Even Surfaces
Avoid running the trowel over uneven or sunken areas. This may result in:
- Failure to maintain control
- Machine overturning
- Surface damage
Avoid Cord Hazards
For electric models:
- Keep cords clear of rotating parts
- Use GFCI outlets and waterproof cords
Maintenance for Long-Term Performance
Regular upkeep ensures your power trowel performs at its best.
| Task | Frequency |
| Check oil level | Daily |
| Clean blades/pans | After each use |
| Inspect belts and fasteners | Weekly |
| Change engine oil | As per manufacturer |
| Grease bearings | Monthly |
| Blade pitch adjustment check | Daily |
Keep a maintenance logbook and follow the manufacturer’s service schedule.
Choosing the Right Power Trowel for the Job
| Job Type | Recommended Model | Features |
| Small residential | Walk-behind, 24–36″ | Lightweight, easy to maneuver |
| Medium commercial | Walk-behind, 36–48″ | Variable pitch, stronger engine |
| Large industrial | Ride-on, dual rotor | Twin blades, joystick controls, hydrostatic drive |
Key selection criteria:
- Blade diameter
- Power source (gas/diesel/electric)
- Control system
- Blade pitch range
- Safety features
Advanced Techniques for Expert Finishers
Burnishing Finish
This high-sheen finish is achieved by using finish blades at maximum pitch and high RPM on a nearly hardened surface. It’s ideal for:
- Warehouse floors
- Decorative concrete
- Polishing prep
Caution: Burnishing seals the surface, which may limit penetration of sealers or stains.
Wet Troweling (Not Recommended)
Some contractors spray water during troweling. While this temporarily extends working time, it weakens surface strength and leads to dusting. Avoid unless using specialty admixtures designed for it.
Mastering the power trowel takes time, attention to detail, and a solid understanding of concrete behavior. By applying the tips outlined in this guide—from timing and blade selection to maintenance and safety—you’ll consistently achieve professional-grade concrete finishes.
Whether you’re finishing a patio or a warehouse floor, achieving perfection requires careful preparation, proper technique, and consistent discipline. As concrete finishing continues to evolve with new tools and technology, staying informed and practicing regularly will set your work apart in both quality and durability.