Key Components of a Portable Concrete Mixer
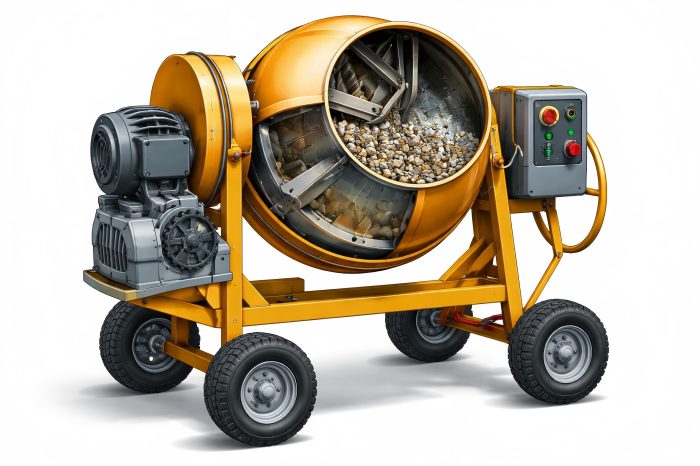
Portable concrete mixers are vital for small to medium construction projects, providing efficient on-site concrete mixing. These mixers are designed to provide mobility, speed, and flexibility, making them indispensable in various applications like home construction, road repair, and landscaping. Understanding the key components of a portable concrete mixer is essential for ensuring optimal performance, durability, and safety. What’s the Component of Portable concrete mixer? Portable concrete mixers efficiently blend cement, water, and aggregates to create uniform concrete mixtures. They are designed to be moved easily around a construction site, enabling workers to mix concrete in smaller batches. These mixers are essential for projects requiring fast, efficient mixing without large-scale equipment. Drum The drum is the heart of any concrete mixer. Its main function is to thoroughly mix ingredients for consistency. The drum is typically cylindrical and mounted on a rotating axis, allowing it to tumble the materials inside. Materials and Design Portable concrete mixer drums are usually made from high-quality steel, which is resistant to wear and tear from constant mixing and exposure to concrete’s abrasiveness. The design of the drum is critical, as it needs to provide efficient mixing while minimizing material wastage. Most drums are designed to rotate in one direction to mix and reverse to discharge the concrete. Types of Drums Rotating Drum: This is the most common type in portable mixers. It rotates on its axis, ensuring the thorough blending of the components. Non-Rotating Drum: These drums are fixed, and concrete is mixed by the rotating blades or paddles inside the drum. The rotation speed of the drum is crucial for proper mixing. A slower speed is often used for heavy, dense mixes, while a higher speed is used for faster mixing in lighter aggregates. Drum Type Rotation Direction Mixing Efficiency Common Uses Rotating Drum Single direction High Small to medium-scale projects Non-Rotating Drum Fixed Moderate Specialty applications, lab use Motor The motor is the powerhouse of the portable concrete mixer. It drives the drum’s rotation and other components of the machine. Depending on the model and application, motors are either electric or gasoline-powered. Types of Motors Electric Motors: Most portable mixers use electric motors, which are efficient and cost-effective, especially for indoor or small-scale operations. Electric motors are ideal for residential and light commercial work, where access to power sources is available. Gasoline Engines: For larger, more industrial applications or sites without access to electricity, gasoline engines are commonly used. These engines provide more power and mobility, especially in remote areas. Motor Power The motor’s power, typically indicated in horsepower (HP), directly influences the performance of the mixer. Smaller mixers generally require 1 to 3 HP, whereas larger models may need 5 HP or higher to operate efficiently. Motor Type Power Output (HP) Fuel Source Suitable For Electric Motor 1 to 3 HP Electricity Small to medium projects Gasoline Engine 3 to 5 HP Gasoline Large-scale, remote locations Gearbox The gearbox transfers the motor’s power to the drum, converting high-speed rotation into slower, more powerful mixing for efficient concrete blending. Types of Gearboxes Single-Speed Gearbox: Common in smaller mixers, providing one speed for drum rotation. Variable-Speed Gearbox: Found in more advanced models, allowing the operator to adjust the speed of the drum, improving the mixing process for different types of materials. Efficiency and Maintenance Gearboxes ensure smooth mixer operation by transferring motor power efficiently. A high-quality gearbox ensures the efficient transfer of power, preventing excessive wear and prolonging the machine’s lifespan. Regular maintenance, such as checking for oil levels and ensuring the gearbox is properly lubricated, is essential for optimal performance. Blades/Paddles Blades or paddles are inside the drum, designed to agitate and mix the ingredients. They are made of steel or durable metals to resist abrasion. Design and Function The blades are positioned strategically inside the drum to maximize the movement and mixing of the concrete ingredients.The blade angle and shape can be adjusted for optimal mixing. The effectiveness of these blades directly impacts the consistency and quality of the concrete mixture. Blades are available in several designs, including: Straight Blades: Common in smaller mixers, these are simple and effective for general mixing. Helical Blades: These are designed for better material flow and mixing, reducing the time needed to achieve the desired consistency. Blade Type Shape Function Ideal For Straight Blades Flat Basic mixing, cost-effective Small batches, residential Helical Blades Spiral/Helical Better flow, faster mixing, reduced time Industrial and large batches Chassis The chassis is the frame that supports the entire mixer, including the drum, motor, gearbox, and other components. It provides stability and ensures the mixer can be safely transported around the job site. Materials and Design Chassis made from steel and aluminum, offering strength, durability, and lightweight design for easy mobility. Features Wheels: Portable mixers often come with large wheels, making it easy to move the mixer around the construction site. Some mixers have pneumatic tires for better traction on rough terrain. Handles: Many portable mixers come with handles on the chassis to allow for manual transportation, while others may have tow bars for moving larger models with vehicles. Loading and Discharging Mechanisms Efficient loading and discharging mechanisms are critical for improving productivity and reducing downtime between batches. Loading Portable mixers often come with manual or automated loading systems. The most common method is a manual loading hopper, where aggregates and cement are poured into the drum. Some advanced models offer a conveyor belt system for automated loading. Discharging Discharging concrete can be done manually by tipping the drum or using a discharge chute for controlled pouring. Some mixers feature electric or hydraulic discharge systems to enhance efficiency. Control Panel The control panel is where operators manage the mixer’s functions, including motor operation, drum rotation, and discharge. The control panel is equipped with switches, dials, and sometimes digital displays for monitoring the mixer’s performance. Functions Motor Control: Start/stop and speed control for the motor. Drum Rotation: Reversing drum direction for discharging concrete. Safety Features: Emergency stop buttons, overload indicators, and safety locks. Safety Features